
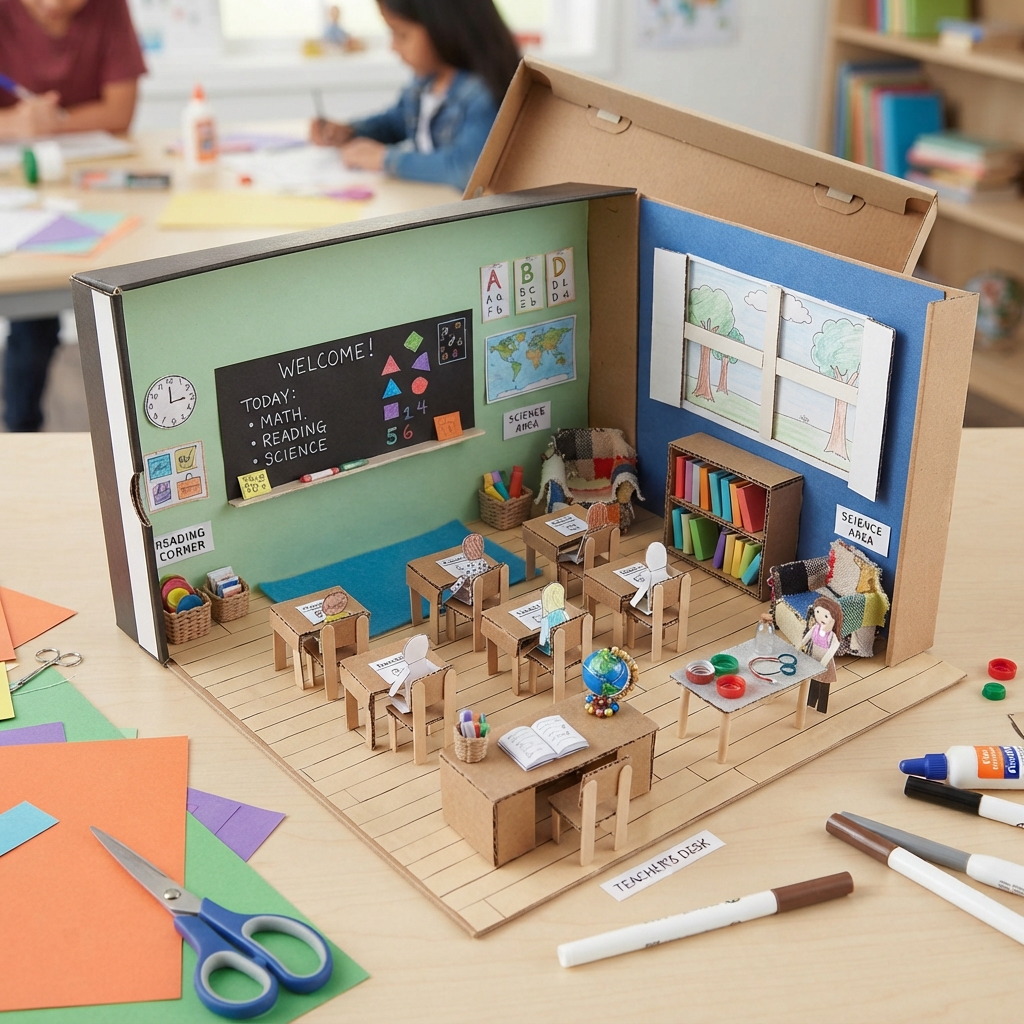
A shoebox section model is a simple and creative educational project that allows students to build a small three-dimensional representation of a classroom, school section, or learning space inside a shoebox. Using cardboard, colored paper, recycled materials, and everyday objects, students can transform an ordinary shoebox into a miniature world. This type of project is especially useful for school assignments because it combines art, design, organization, and learning in one activity.
The idea of creating a section model inside a shoebox is not only enjoyable but also educational. Students learn how to observe a real environment, identify its important parts, plan a layout, measure spaces, and represent objects on a smaller scale. They also develop creativity and problem-solving skills while working with simple materials. A finished shoebox model can be displayed in the classroom or used as a visual aid during a presentation.
Understanding the Shoebox Section Model
A section model is a simplified representation of a larger space. Instead of showing a complete building or classroom at its actual size, the model presents the important elements in a smaller format. A shoebox is ideal because it provides a ready-made rectangular structure with a bottom, sides, and sometimes a removable lid.
The inside of the shoebox can become the floor and walls of the miniature environment. Students can decide what kind of section they want to represent. It could be a classroom, library section, science corner, art room, reading area, school office, or another educational space.
The project can be designed according to the student’s age and ability. Younger children can focus on basic shapes and colors, while older students can include more detailed furniture, labels, measurements, and realistic arrangements.
Materials Needed
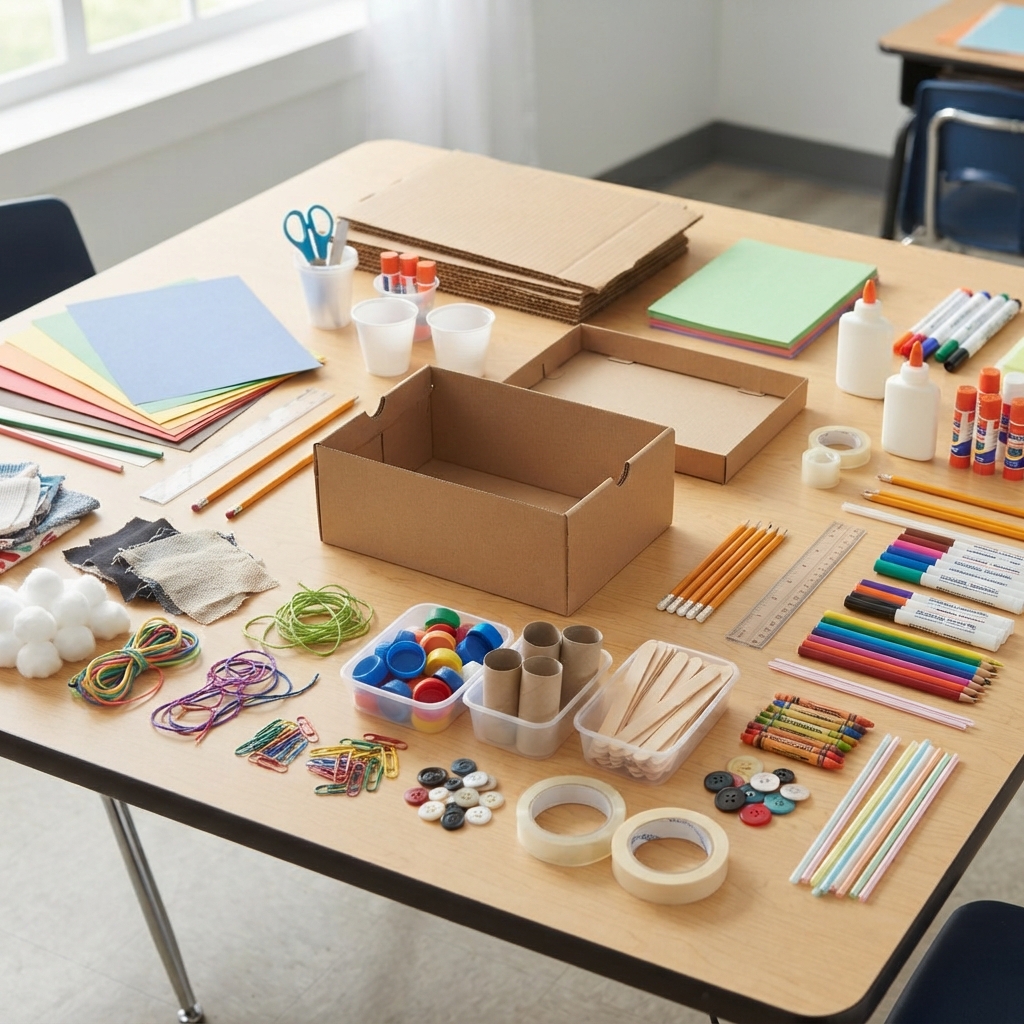
One advantage of a shoebox model is that it does not require expensive materials. Most supplies can be found at home or in a classroom.
Common materials include a clean shoebox, colored paper, cardboard, scissors, glue, tape, pencils, rulers, markers, crayons, and colored pencils. Recycled materials can also be useful. Bottle caps can become tables or stools, small pieces of cardboard can become shelves, and craft sticks can be used to create furniture.
Other useful materials include cotton, fabric scraps, string, paper clips, buttons, drinking straws, wooden sticks, and small recycled containers. Students can choose materials according to the design they have in mind.
Before beginning, all materials should be organized on a table. Children should use scissors and other tools carefully and follow appropriate safety instructions.
Planning the Design
Good planning is one of the most important parts of making a shoebox section model. Before cutting or gluing anything, students should decide what they want the finished model to look like.
A simple sketch can help. The student can draw the shoebox from above and decide where the important objects will be placed. For a classroom model, the sketch might include desks, chairs, a teacher’s desk, a board, a bookshelf, a reading corner, and a door.
Planning also prevents the model from becoming overcrowded. Every object should have enough space around it. The student should think about how people would move through the real room and try to represent that arrangement in the miniature model.
Creating the Floor
The first physical step is usually preparing the floor. The bottom of the shoebox can be covered with colored paper or cardboard. A gray sheet might represent a tiled floor, while brown paper could represent wooden flooring.
Students can draw lines to create tiles or use strips of paper to make a patterned floor. A ruler can help make straight and even lines.
For a classroom, the floor might include a colorful rug in the reading area. A small piece of fabric can be used to create a realistic carpet. This is a good example of how ordinary household materials can become interesting details.
Decorating the Walls
The sides of the shoebox can represent the walls of the room. Students can cover them with paper in different colors. A classroom might have light-colored walls with educational posters.
Small pieces of paper can be used to create posters containing letters, numbers, shapes, maps, or motivational messages. A miniature clock can be drawn and attached to one wall.
A classroom board can be made from black or dark-colored paper. Students can write a small lesson title or draw simple educational symbols on it. A tiny calendar can also be added to make the model more realistic.
Making Miniature Furniture
Creating miniature furniture is one of the most enjoyable parts of the project. Cardboard can be cut and folded to make desks, tables, chairs, shelves, and cabinets.
For example, a small rectangular piece of cardboard can become a student desk. Four tiny strips can be attached underneath as legs. Another piece can become the teacher’s desk.
Chairs can be made from small pieces of cardboard or craft sticks. Although the furniture does not need to be perfect, students should try to keep the sizes consistent.
The furniture can be colored to match the chosen classroom theme. Students may also label different pieces to make their purpose clear.
Adding a Teacher’s Area
A classroom section model can include a small teacher’s area. A miniature teacher’s desk can be placed near the front of the classroom. A tiny chair, books, papers, and a pencil holder can be added.
A small cardboard board behind the desk can show a lesson or classroom message. Students might write “Welcome,” “Today We Learn,” or the name of a subject.
This part of the model helps viewers understand how the classroom is organized and where the teacher usually works.
Creating a Reading Corner
A reading corner can make the shoebox classroom more interesting. A small piece of fabric can become a rug, while tiny cardboard rectangles can become books.
A miniature bookshelf can be constructed from cardboard. Small colored rectangles can be placed inside it to represent books. A tiny chair or cushion can complete the area.
The reading corner demonstrates how classrooms can contain different spaces for different activities. It also gives students an opportunity to think about how learning environments can be comfortable and inviting.
Making a Science Corner
Another possibility is to include a small science corner. Students can create a miniature table with tiny objects representing science equipment.
Small bottle caps, beads, paper circles, and pieces of cardboard can become pretend containers, test tubes, or laboratory tools. A small poster showing planets, animals, plants, or the human body can be placed on the wall.
This section can make the model particularly useful for science projects. It shows how different learning activities can take place within the same classroom.
Adding Students and People
Miniature people can bring the model to life. Students can draw tiny figures on paper, cut them out, and attach them to cardboard stands.
Another option is to use small paper figures representing students sitting at desks. Different colors of clothing can make the figures visually interesting.
Students can also create a miniature teacher standing near the board. The figures do not need to be highly detailed. Simple shapes are enough to communicate the idea.
Including people also helps demonstrate classroom activities and movement.
Creating Doors and Windows
Doors and windows are important parts of a realistic section model. A door can be made from rectangular cardboard and attached to one side of the shoebox.
Windows can be drawn or constructed using blue paper and thin cardboard strips. The blue area can represent glass, while white or brown strips can form the window frame.
Students can even add curtains made from tiny pieces of fabric. A small view of trees, clouds, or buildings can be drawn behind the window to create the impression of an outside environment.
Adding Educational Details
Educational details make the model more than a simple craft. A miniature alphabet chart, multiplication table, map, science poster, or classroom rules sign can be placed on the walls.
Student names can be written on small cards and placed on desks. A tiny timetable can show the subjects studied during the school day.
A classroom calendar can also be included. These details make the project informative and encourage students to think about the purpose of each object.
Using Recycled Materials
A shoebox section model is an excellent opportunity to teach students about recycling. Instead of purchasing special materials, students can reuse objects that would normally be thrown away.
Cardboard packaging can become furniture. Bottle caps can become stools or tables. Old magazines can provide colorful pictures for posters. Paper scraps can become books, decorations, or signs.
Using recycled materials also makes the project affordable. More importantly, it teaches students that creativity can give new life to everyday objects.
Making the Model Attractive
Color is an important part of a successful shoebox model. However, using too many colors can make the design look confusing. Students should choose a simple color scheme and repeat those colors throughout the model.
Neat cutting and careful gluing can also improve the final appearance. Small details should be attached securely so that they do not fall off when the model is moved.
Labels can make the model easier to understand. Small signs can identify the “Reading Corner,” “Science Area,” “Teacher’s Desk,” “Library,” or “Board.”
Educational Benefits
Creating a shoebox section model offers many educational benefits. First, it develops creativity because students must imagine how a large environment can be represented using small materials.
Second, the activity improves spatial awareness. Students learn about position, distance, size, direction, and organization. They begin to understand concepts such as left, right, front, back, near, and far.
The project can also introduce basic mathematics. Students can measure the shoebox, calculate approximate proportions, and compare the sizes of different objects.
It also develops fine motor skills. Cutting, folding, drawing, gluing, and arranging small pieces require concentration and hand control.
Finally, the project improves communication skills. Students can explain their design to classmates, teachers, or parents and describe why they placed objects in particular locations.
Working as a Team
A shoebox section model can be completed individually or as a group. When students work together, each person can have a responsibility.
One student might design the floor, another can create furniture, another can prepare wall decorations, and another can make miniature people. Working together teaches cooperation and communication.
Students also learn how to share materials, listen to different ideas, solve disagreements, and complete a common goal.
Presenting the Finished Model
Once the model is complete, students can present it to the class. They can explain the theme, materials, design, and special features.
A student might say, “This is our miniature classroom. We created a reading corner, a science area, a teacher’s desk, and six student desks.”
The presentation gives students an opportunity to practice speaking clearly and confidently. It also allows classmates to compare different designs and discover new ideas.
Conclusion
A shoebox section model is a creative, affordable, and educational school project. With a simple shoebox and everyday materials, students can construct a miniature classroom or another learning environment filled with interesting details.
The process begins with planning and continues through creating the floor, decorating walls, building furniture, adding educational areas, and placing miniature people and objects. Recycled materials can make the project more sustainable, while careful colors and labels can make it attractive and easy to understand.
Most importantly, the activity combines learning with creativity. Students practice mathematics, design, organization, communication, teamwork, and fine motor skills while making something they can proudly display.
A finished shoebox model may be small, but the learning behind it can be significant. It teaches students how ideas can be transformed into physical objects through planning, patience, imagination, and teamwork. Whether the project represents a classroom, library, science room, or another school space, a shoebox provides a simple starting point for an exciting three-dimensional learning experience.
