
Posted in

How to Make a Beaded Cat for Children

How to Make a Beaded Cat for Children

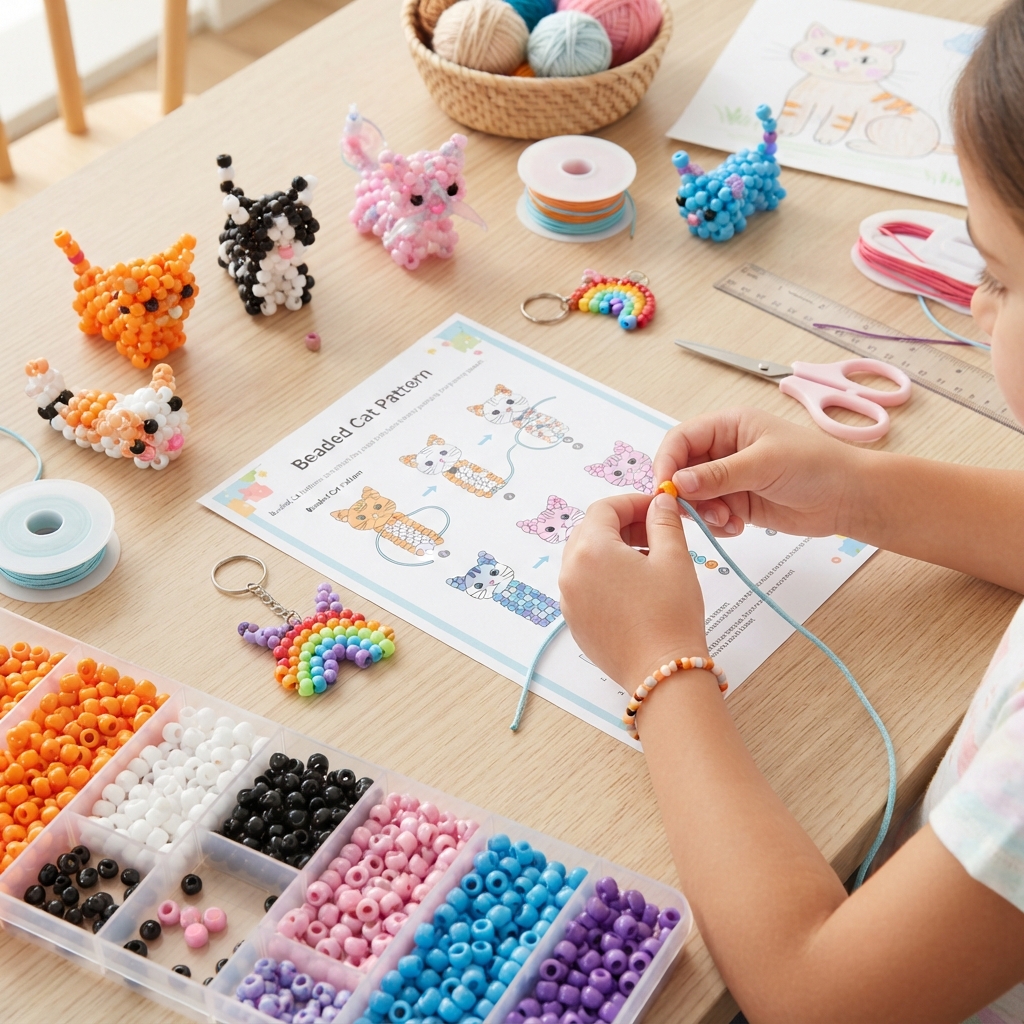
Making a cat from colorful beads is a fun and creative craft project for children. With Pony Beads, craft cord, and a simple pattern, kids can create a cute little cat that can be used as a decoration, backpack charm, keychain, or handmade gift.

This project is perfect for children who love animals and enjoy colorful crafts. They can make a realistic-looking cat or invent a magical cat using bright rainbow colors.

Beading also gives children an opportunity to practice fine motor skills, counting, concentration, patience, and pattern recognition.

Why Make a Beaded Cat?

Creating a beaded cat can be both fun and educational. While working on the project, children can practice:

  • Fine motor skills
  • Hand-eye coordination
  • Counting
  • Color recognition
  • Pattern following
  • Concentration
  • Patience
  • Creativity

Children can also learn how different colors and patterns can change the appearance of their finished animal.

Materials You Will Need
# How to Make a Beaded Cat for Children

Making a cat from colorful beads is a fun and creative craft project for children. With Pony Beads, craft cord, and a simple pattern, kids can create a cute little cat that can be used as a decoration, backpack charm, keychain, or handmade gift.

This project is perfect for children who love animals and enjoy colorful crafts. They can make a realistic-looking cat or invent a magical cat using bright rainbow colors.

Beading also gives children an opportunity to practice fine motor skills, counting, concentration, patience, and pattern recognition.

## Why Make a Beaded Cat

Creating a beaded cat can be both fun and educational. While working on the project, children can practice

 Fine motor skills
 Hand-eye coordination
 Counting
 Color recognition
 Pattern following
 Concentration
 Patience
 Creativity

Children can also learn how different colors and patterns can change the appearance of their finished animal.

## Materials You Will Need

To make a simple beaded cat, gather

 Pony Beads in your favorite colors
 Black beads for the eyes
 Pink or red beads for the nose
 White beads for details
 Craft cord or suitable beading string
 Scissors
 A ruler
 A simple cat bead pattern

Pony Beads are a good choice for beginners because their relatively large holes make them easier to thread.

Safety note Small beads and craft cords can be choking hazards. Young children should always work under adult supervision. Keep loose beads away from very young children.

# Choosing the Cat's Colors

Children can choose any colors for their beaded cat.

For a realistic-looking cat, try

 Gray and white
 Orange and white
 Black and white
 Brown and cream

For a fantasy cat, try

 Pink and purple
 Blue and turquoise
 Rainbow colors
 Green and yellow

Children can also create stripes, spots, or other patterns.

# Step 1 Prepare the Cord

Cut a suitable length of craft cord.

Leave extra cord at the ends so you can secure the finished cat.

Sort the beads by color before starting.

Organizing the beads makes it easier to follow the pattern.

# Step 2 Make the Cat's Body

Begin with the body.

Thread the beads according to your chosen pattern.

Create a small rounded or slightly rectangular shape for the body.

Keep the beadwork flexible and avoid pulling the cord too tightly.

# Step 3 Create the Head

Continue the pattern to make the cat's head.

The head can be slightly wider than the neck.

Use a different color for the face if you want to create a contrasting design.

# Step 4 Add the Ears

A cat's pointed ears are an important part of the design.

Create two small triangular ears using a few beads.

Try to make both ears similar in size.

You can use pink beads inside the ears for extra detail.

# Step 5 Add the Eyes

Use two black or dark-colored beads for the eyes.

Place them evenly on the face.

For a cute cartoon-style cat, use white beads behind the dark beads to make the eyes look larger.

# Step 6 Make the Nose

Add a small pink bead to represent the cat's nose.

Place it below the eyes.

A tiny black bead can also be used if you prefer a different color.

# Step 7 Add the Whiskers

Whiskers can be represented with short pieces of craft cord.

Create a few small strands on each side of the face.

Ask an adult for help when cutting and attaching the cord.

For a very simple pattern, the whiskers can also be left out.

# Step 8 Create the Legs

Add four small legs to the bottom of the body.

Try to make the front and back legs similar in size.

You can use the same color as the body or add contrasting beads.

# Step 9 Make the Tail

The tail is another important feature of the cat.

Create a long, curved tail using several beads.

You can make the tail straight, curled, or slightly bent.

Use a contrasting color to make it stand out.

# Step 10 Add Colorful Details

Now children can personalize their cat.

Try adding

 Stripes
 Spots
 A colorful tail
 Different-colored ears
 A bright collar
 A rainbow pattern

The goal is to let every child create a unique cat.

# Step 11 Secure the Cat

When the cat is finished, carefully secure the ends of the cord.

Tie a firm knot and trim away the excess cord.

An adult should check the knot to make sure it is secure.

If the cat will be used as a keychain or charm, make sure the attachment is firmly connected.

# Turn the Cat Into a Keychain

A finished beaded cat makes a cute keychain or backpack charm.

Attach a suitable keychain ring or clip to a secure point on the cat.

It can decorate

 Backpacks
 Pencil cases
 School bags
 Craft bags

Always check that the attachment is secure before using the finished craft.

# Creative Cat Color Ideas

## Orange Tabby

Use orange, cream, and white beads to create a classic striped cat.

## Black and White Cat

Combine black and white beads for a simple two-color design.

## Rainbow Cat

Use bright colors throughout the body, ears, and tail.

## Pink Fantasy Cat

Combine pink, purple, white, and yellow beads.

## Blue Cat

Use different shades of blue and turquoise to create a magical-looking cat.

# Make a Family of Cats

Once children learn the basic pattern, they can make several cats.

Create different sizes, colors, and patterns.

For example

 A large orange cat
 A small gray cat
 A black-and-white cat
 A rainbow cat
 A pink fantasy cat

Children can give each cat a name and create stories about their adventures.

# Create a Beaded Cat Family Scene

The beaded cats can become part of a larger craft display.

Use cardboard or colored paper to create a little home for the cats.

Add

 A house
 Grass
 Flowers
 Trees
 Food bowls
 Toy balls
 Small beds

Children can arrange their cats in different parts of the scene.

# Turn the Craft Into a Learning Activity

Making a beaded cat can also be an educational activity.

Children can learn about

 Domestic cats
 Wild cats
 Cat body parts
 Animal colors and patterns
 Pet care
 Responsible animal ownership

They can also count the beads used for the ears, legs, body, and tail.

This makes the project a combination of art, science, and mathematics.

# Tips for Beginners

Use large beads that are easy for children to handle.

Sort the beads by color before starting.

Keep the pattern nearby.

Work on one section at a time.

Count the beads carefully.

Avoid pulling the cord too tightly.

Check that both ears and legs are balanced.

Ask an adult for help with cutting and tying the cord.

Let children experiment with colors and patterns.

The finished cat does not need to be perfect. Creativity and enjoyment are the most important parts of the project.

# Common Mistakes to Avoid

## Losing Track of the Pattern

Check each row before moving forward.

## Pulling the Cord Too Tightly

Too much tension can distort the cat's body.

## Making Uneven Ears

Compare both ears while working to keep the face balanced.

## Forgetting the Tail

The tail helps make the animal easily recognizable.

## Making the Tail Too Short

A longer tail can create a more playful and recognizable cat shape.

## Using a Loose Knot

A weak knot can cause the beads to fall off.

Secure the cord carefully before trimming it.

# A Fun Classroom Craft

Beaded cats are excellent for classroom craft activities.

Teachers can connect the project to lessons about

 Animals
 Pets
 Colors
 Patterns
 Counting
 Shapes

Children can make different animals and display them together on a classroom bulletin board.

# A Handmade Gift Idea

A beaded cat can make a lovely handmade gift for a friend or family member.

Children can choose the recipient's favorite colors and create a personalized cat.

A small handmade card can make the gift even more special.

# More Beaded Animals to Make

After completing the cat, children can try other animal crafts.

Ideas include

 Beaded dog
 Beaded rabbit
 Beaded fox
 Beaded owl
 Beaded bird
 Beaded butterfly
 Beaded frog

Together, these projects can become a colorful handmade animal collection.

# Conclusion

Making a beaded cat is a fun and creative activity for children. It combines colorful beadwork with opportunities to practice fine motor skills, counting, concentration, pattern recognition, and imagination.

With Pony Beads, craft cord, and a simple pattern, children can create an orange tabby, a black-and-white cat, a rainbow cat, or a completely imaginary feline friend.

The finished cat can become a decoration, keychain, backpack charm, classroom project, or handmade gift.

Always supervise young children when using small beads and craft cords. With safe materials, simple instructions, and plenty of creativity, making a beaded cat can be an enjoyable and rewarding craft project for children at home or in the classroom.

To make a simple beaded cat, gather:

  • Pony Beads in your favorite colors
  • Black beads for the eyes
  • Pink or red beads for the nose
  • White beads for details
  • Craft cord or suitable beading string
  • Scissors
  • A ruler
  • A simple cat bead pattern

Pony Beads are a good choice for beginners because their relatively large holes make them easier to thread.

Safety note: Small beads and craft cords can be choking hazards. Young children should always work under adult supervision. Keep loose beads away from very young children.

Choosing the Cat’s Colors

Children can choose any colors for their beaded cat.

For a realistic-looking cat, try:

  • Gray and white
  • Orange and white
  • Black and white
  • Brown and cream

For a fantasy cat, try:

  • Pink and purple
  • Blue and turquoise
  • Rainbow colors
  • Green and yellow

Children can also create stripes, spots, or other patterns.

Step 1: Prepare the Cord

Cut a suitable length of craft cord.

Leave extra cord at the ends so you can secure the finished cat.

Sort the beads by color before starting.

Organizing the beads makes it easier to follow the pattern.

Step 2: Make the Cat’s Body

Begin with the body.

Thread the beads according to your chosen pattern.

Create a small rounded or slightly rectangular shape for the body.

Keep the beadwork flexible and avoid pulling the cord too tightly.

Step 3: Create the Head

Continue the pattern to make the cat’s head.

The head can be slightly wider than the neck.

Use a different color for the face if you want to create a contrasting design.

Step 4: Add the Ears

A cat’s pointed ears are an important part of the design.

Create two small triangular ears using a few beads.

Try to make both ears similar in size.

You can use pink beads inside the ears for extra detail.

Step 5: Add the Eyes

Use two black or dark-colored beads for the eyes.

Place them evenly on the face.

For a cute cartoon-style cat, use white beads behind the dark beads to make the eyes look larger.

Step 6: Make the Nose

Add a small pink bead to represent the cat’s nose.

Place it below the eyes.

A tiny black bead can also be used if you prefer a different color.

Step 7: Add the Whiskers

Whiskers can be represented with short pieces of craft cord.

Create a few small strands on each side of the face.

Ask an adult for help when cutting and attaching the cord.

For a very simple pattern, the whiskers can also be left out.

Step 8: Create the Legs

Add four small legs to the bottom of the body.

Try to make the front and back legs similar in size.

You can use the same color as the body or add contrasting beads.

Step 9: Make the Tail

The tail is another important feature of the cat.

Create a long, curved tail using several beads.

You can make the tail straight, curled, or slightly bent.

Use a contrasting color to make it stand out.

Step 10: Add Colorful Details

Now children can personalize their cat.

Try adding:

  • Stripes
  • Spots
  • A colorful tail
  • Different-colored ears
  • A bright collar
  • A rainbow pattern

The goal is to let every child create a unique cat.

Step 11: Secure the Cat

When the cat is finished, carefully secure the ends of the cord.

Tie a firm knot and trim away the excess cord.

An adult should check the knot to make sure it is secure.

If the cat will be used as a keychain or charm, make sure the attachment is firmly connected.

Turn the Cat Into a Keychain

A finished beaded cat makes a cute keychain or backpack charm.

Attach a suitable keychain ring or clip to a secure point on the cat.

It can decorate:

  • Backpacks
  • Pencil cases
  • School bags
  • Craft bags

Always check that the attachment is secure before using the finished craft.

Creative Cat Color Ideas

Orange Tabby

Use orange, cream, and white beads to create a classic striped cat.

Black and White Cat

Combine black and white beads for a simple two-color design.

Rainbow Cat

Use bright colors throughout the body, ears, and tail.

Pink Fantasy Cat

Combine pink, purple, white, and yellow beads.

Blue Cat

Use different shades of blue and turquoise to create a magical-looking cat.

Make a Family of Cats

Once children learn the basic pattern, they can make several cats.

Create different sizes, colors, and patterns.

For example:

  • A large orange cat
  • A small gray cat
  • A black-and-white cat
  • A rainbow cat
  • A pink fantasy cat

Children can give each cat a name and create stories about their adventures.

Create a Beaded Cat Family Scene

The beaded cats can become part of a larger craft display.

Use cardboard or colored paper to create a little home for the cats.

Add:

  • A house
  • Grass
  • Flowers
  • Trees
  • Food bowls
  • Toy balls
  • Small beds

Children can arrange their cats in different parts of the scene.

Turn the Craft Into a Learning Activity

Making a beaded cat can also be an educational activity.

Children can learn about:

  • Domestic cats
  • Wild cats
  • Cat body parts
  • Animal colors and patterns
  • Pet care
  • Responsible animal ownership

They can also count the beads used for the ears, legs, body, and tail.

This makes the project a combination of art, science, and mathematics.

Tips for Beginners

Use large beads that are easy for children to handle.

Sort the beads by color before starting.

Keep the pattern nearby.

Work on one section at a time.

Count the beads carefully.

Avoid pulling the cord too tightly.

Check that both ears and legs are balanced.

Ask an adult for help with cutting and tying the cord.

Let children experiment with colors and patterns.

The finished cat does not need to be perfect. Creativity and enjoyment are the most important parts of the project.

Common Mistakes to Avoid

Losing Track of the Pattern

Check each row before moving forward.

Pulling the Cord Too Tightly

Too much tension can distort the cat’s body.

Making Uneven Ears

Compare both ears while working to keep the face balanced.

Forgetting the Tail

The tail helps make the animal easily recognizable.

Making the Tail Too Short

A longer tail can create a more playful and recognizable cat shape.

Using a Loose Knot

A weak knot can cause the beads to fall off.

Secure the cord carefully before trimming it.

A Fun Classroom Craft

Beaded cats are excellent for classroom craft activities.

Teachers can connect the project to lessons about:

  • Animals
  • Pets
  • Colors
  • Patterns
  • Counting
  • Shapes

Children can make different animals and display them together on a classroom bulletin board.

A Handmade Gift Idea

A beaded cat can make a lovely handmade gift for a friend or family member.

Children can choose the recipient’s favorite colors and create a personalized cat.

A small handmade card can make the gift even more special.

More Beaded Animals to Make

After completing the cat, children can try other animal crafts.

Ideas include:

  • Beaded dog
  • Beaded rabbit
  • Beaded fox
  • Beaded owl
  • Beaded bird
  • Beaded butterfly
  • Beaded frog

Together, these projects can become a colorful handmade animal collection.

Conclusion

Making a beaded cat is a fun and creative activity for children. It combines colorful beadwork with opportunities to practice fine motor skills, counting, concentration, pattern recognition, and imagination.

With Pony Beads, craft cord, and a simple pattern, children can create an orange tabby, a black-and-white cat, a rainbow cat, or a completely imaginary feline friend.

The finished cat can become a decoration, keychain, backpack charm, classroom project, or handmade gift.

Always supervise young children when using small beads and craft cords. With safe materials, simple instructions, and plenty of creativity, making a beaded cat can be an enjoyable and rewarding craft project for children at home or in the classroom.

Leave a Reply

Your email address will not be published. Required fields are marked *