

Making a turtle from colorful beads is a fun and creative craft project for children. It is an easy way to introduce kids to simple beadwork while helping them develop patience, concentration, and fine motor skills. With a few colorful beads, craft cord, and a simple pattern, children can create a cute turtle to use as a decoration, keychain, or handmade gift.
This project can be adapted for different ages and skill levels. Children can follow a basic turtle pattern or create their own design using different colors.
Why Make a Beaded Turtle?
Beaded crafts are not only enjoyable but can also support children’s development. While making a beaded turtle, children can practice:
- Fine motor skills
- Hand-eye coordination
- Counting
- Color recognition
- Pattern following
- Concentration
- Creative thinking
The finished turtle can also become a fun decoration for a bedroom, backpack, pencil case, or craft display.
Materials You Will Need
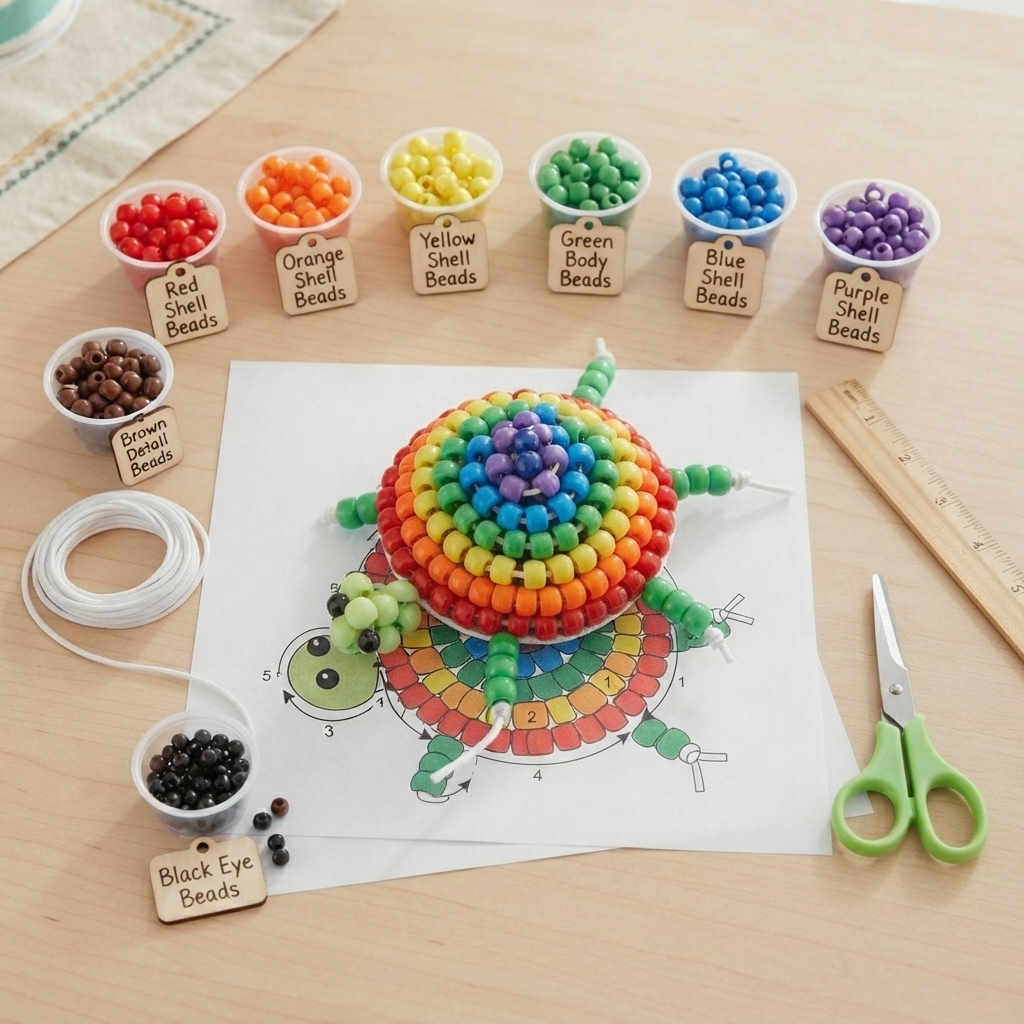
Before starting, collect the following materials:
- Green pony beads
- Brown or yellow beads for the shell
- Black beads for the eyes
- White or lighter-colored beads for details
- Craft cord or suitable beading string
- Scissors
- A simple turtle bead pattern
- A ruler
Pony beads are especially useful for beginners because their larger holes make them easier to thread.
Safety note: Small beads can be a choking hazard. Young children should always work with an adult’s supervision, and beads and loose cord should be kept away from very young children.
Choosing Colors
Children can use traditional turtle colors or invent a completely new design.
For a natural-looking turtle, try:
- Green for the head and legs
- Brown for the shell
- Dark green for details
- Black for the eyes
For a colorful fantasy turtle, try combinations such as blue and purple, pink and yellow, or orange and green.
There is no need to follow one color scheme. The goal is to encourage creativity.
Step 1: Prepare the Cord
Cut a suitable length of beading cord.
Leave enough cord at the ends so you can secure the turtle when the beadwork is finished.
Place the beads into small groups according to color. Organizing them beforehand makes it easier to follow the pattern.
Step 2: Make the Turtle’s Shell
Start with the shell because it is the largest part of the turtle.
Thread the beads according to your chosen pattern.
Use brown, green, yellow, or several colors to create the shell.
Try to keep the rows organized so that the shell maintains its shape.
Children can create stripes, spots, or geometric patterns using contrasting beads.
Step 3: Create the Turtle’s Head
Once the shell is ready, add beads for the turtle’s head.
Use green beads for a traditional turtle or another color for a more imaginative design.
The head should be positioned at one end of the shell.
Add two small contrasting beads for the eyes.
Step 4: Add the Four Legs
A turtle needs four legs, so this is an important part of the design.
Create two front legs and two back legs using green beads or another color.
The back legs can be slightly larger than the front legs.
Follow the bead pattern carefully to make sure the legs are positioned evenly.
Step 5: Add the Tail
Add a few beads at the back of the shell to create a small tail.
The tail can be short and simple.
A few beads are usually enough to make the shape recognizable.
Step 6: Add Decorative Details
Now comes the creative part.
You can decorate the shell with:
- Spots
- Stripes
- Flowers
- Stars
- Zigzag patterns
- Rainbow colors
Children can choose their own design and make every turtle different.
Step 7: Secure the Beads
When all the beads have been added, carefully secure the ends of the cord.
Tie a strong knot and trim the excess cord.
An adult should check the finished knot to make sure the beads cannot easily come loose.
If the turtle will be used as a keychain, attach a suitable keychain ring or clip securely.
Make a Beaded Turtle Keychain
A finished beaded turtle can easily be transformed into a small keychain.
Attach a keychain ring to the top of the turtle.
Children can use it to decorate a backpack, pencil case, or craft bag.
Make sure the attachment is secure before using the keychain.
Fun Turtle Color Combinations
Classic Turtle
Use green beads for the body and brown or dark green beads for the shell.
Rainbow Turtle
Use several bright colors to create a cheerful rainbow shell.
Ocean Turtle
Choose blue, turquoise, and green beads to create an underwater-inspired turtle.
Tropical Turtle
Use bright yellow, orange, pink, and green beads for a colorful tropical design.
Space Turtle
Use dark blue, purple, silver, and bright colors to create a fun fantasy turtle inspired by outer space.
Make a Family of Turtles
Once children understand the basic pattern, they can make several turtles.
Create turtles of different colors and sizes.
For example:
- A big green turtle
- A small blue turtle
- A yellow turtle
- A rainbow turtle
- A purple turtle
Children can give each turtle a name and invent a story about where the turtle family lives.
Turn the Craft Into a Learning Activity
A beaded turtle can become more than just a craft.
Parents and teachers can use the project to introduce children to turtles and nature.
Talk about:
- Where turtles live
- What turtles eat
- How turtles move
- The difference between land turtles and sea turtles
- Why clean water is important for aquatic animals
Children can also count how many beads they use for each body part.
This combines art, counting, and nature education in one activity.
Tips for Beginners
Choose larger beads for young beginners.
Sort the beads by color before starting.
Follow the pattern one row at a time.
Count the beads carefully.
Keep the cord organized while working.
Avoid pulling the cord too tightly.
Check the turtle’s shape regularly.
Ask an adult for help with cutting and securing the cord.
Most importantly, allow children to experiment and create their own designs.
Common Mistakes to Avoid
Losing Track of the Pattern
Work slowly and check each row before moving on.
Using Too Much Tension
Pulling the cord too tightly can distort the shape.
Keep the beadwork firm but flexible.
Forgetting a Body Part
Count the legs and check that the head and tail are correctly positioned before finishing.
Making a Loose Knot
A loose knot can allow the beads to fall off.
Secure the ends carefully.
A Great School Craft
Beaded turtles are excellent for classroom craft activities.
Teachers can prepare the materials in advance and allow children to choose their colors.
Children can then display their finished turtles on a classroom craft board.
The activity can also be combined with a lesson about oceans, animals, nature, or environmental protection.
A Creative Gift Idea
A beaded turtle can make a sweet handmade gift for a family member or friend.
Children can choose colors that remind them of the person receiving the gift.
A small handmade card can be added with a message explaining that the turtle was made especially for them.
Conclusion
Making a beaded turtle is a colorful and enjoyable activity for children. It combines simple beadwork with creativity while helping children practice counting, pattern recognition, concentration, and fine motor skills.
With a few beads, some cord, and a simple pattern, children can create a charming turtle in almost any color. Once they master the basic design, they can experiment with rainbow shells, ocean-inspired colors, turtle families, and cute keychains.
Always supervise young children when using small beads and craft cords. Most importantly, encourage children to enjoy the creative process and take pride in making something with their own hands.
