
Posted in

A Small School Table and Chair Made from Wooden Sticks

# A Small School Table and Chair Made from Wooden Sticks Creating a small school table and chair from wooden sticks is a simple, creative, and educational craft project. With a few wooden craft sticks, glue, cardboard, and colorful materials, children can build a miniature classroom furniture set. This project combines creativity, practical skills, basic engineering, and imagination. It can be used for a school assignment, a classroom decoration, a miniature school model, or simply a fun activity at home. A miniature table and chair may look simple, but making them requires planning and careful construction. Students need to think about the size and shape of each piece, decide how the wooden sticks will be arranged, and make sure the furniture is stable. Through this process, children learn that even small objects need good design and strong connections between their parts. ## The Idea Behind the Project The purpose of the project is to reproduce two familiar pieces of classroom furniture on a much smaller scale. A school table usually has a flat surface supported by legs, while a school chair has a seat, a backrest, and legs. Wooden craft sticks are ideal for this type of project because they are lightweight, easy to arrange, and available in many craft stores. They can also be painted or decorated to create different styles. The finished table and chair can be placed inside a miniature classroom made from a shoebox or cardboard box. Students can add tiny books, pencils, notebooks, and other school supplies to make the scene more realistic. ## Materials Needed The materials required for this project are inexpensive and easy to find. The main materials are wooden craft sticks, strong craft glue, cardboard, scissors, a pencil, and a ruler. Additional materials can include colored paper, markers, crayons, acrylic or craft paint, paintbrushes, and small pieces of fabric. Recycled cardboard can be used for additional support. Students may also use beads, buttons, or tiny pieces of paper to decorate the furniture. Because glue and scissors are involved, younger children should complete the activity with appropriate adult supervision. ## Planning the Furniture Before building, students should make a simple drawing of the table and chair. Planning helps them decide how many sticks they need and where each piece should be placed. The table should be wider than the chair. The tabletop needs to be large enough to hold miniature books or school supplies. The chair should be slightly lower than the table. A ruler can be used to measure the length and width of different parts. Students do not need exact measurements, but keeping the pieces proportional will make the finished furniture look more realistic. ## Making the Tabletop The tabletop can be made by placing several wooden sticks side by side. The sticks should be arranged in parallel lines to create a flat rectangular surface. A couple of additional sticks can be placed underneath in the opposite direction to strengthen the structure. These support sticks should be glued carefully underneath the tabletop. Students should allow the glue to dry before adding the legs. This is important because the tabletop needs to remain flat and stable. If the wooden sticks are too narrow for the desired design, several can be joined together. The more sticks used, the wider the tabletop becomes. ## Building the Table Legs The table needs four legs to remain stable. Each leg can be made from one or more wooden sticks. The legs should be positioned near the corners of the tabletop. They need to be attached at approximately equal distances from the edges. Students should check that the legs are similar in length. If one leg is much shorter than the others, the table may wobble. Small cardboard supports can be added between the legs if extra stability is needed. These supports can also make the miniature table look more realistic. ## Strengthening the Table A strong connection between the tabletop and legs is essential. Glue should be applied carefully to the contact areas. Students can add horizontal wooden sticks between the legs. These pieces act like braces and help prevent the legs from moving sideways. This introduces a basic engineering concept structures become stronger when their parts are connected properly. Students can test the table by placing a small paper book on top. If it remains stable, the design is probably strong enough. ## Creating the Chair Seat The chair seat can be constructed in a similar way. Several wooden sticks can be arranged side by side to create a small square or rectangular seat. Two support sticks can be glued underneath the seat. These supports help keep the sticks together. The chair seat should be smaller than the tabletop and positioned at a comfortable miniature height. Students should make sure the surface is relatively flat so that a small paper figure or toy can sit on it. ## Making the Chair Legs The chair needs four legs. Wooden sticks can be attached underneath the seat, one near each corner. The legs should be approximately equal in length. Students can use a ruler to compare them before gluing. For additional stability, small horizontal sticks can connect the legs. These supports can be placed near the bottom or underneath the seat. Once the glue dries, the chair should stand without falling over. ## Adding the Chair Backrest The backrest is one of the most recognizable features of a school chair. It can be made by attaching several wooden sticks vertically or horizontally behind the seat. One simple design uses two vertical sticks as supports with two or three horizontal sticks between them. Another design can use several sticks placed closely together to form a solid backrest. Students can experiment with different patterns. They might create a traditional rectangular back or a more decorative shape. ## Making the Furniture Proportional Proportion is important when creating miniature furniture. If the chair is too tall compared with the table, the model may look unrealistic. Students should compare the height of the chair seat with the height of the table. The chair should generally be lower, allowing a miniature student figure to appear as though it could sit at the table. This part of the project provides an opportunity to discuss scale. A real school table is much larger than the model, but the same basic proportions can be maintained. ## Decorating the Table and Chair Once the construction is complete and the glue has dried, students can decorate their furniture. The wooden sticks can be painted in traditional colors such as brown, white, gray, or natural wood tones. However, children can also choose bright colors. A colorful table might have a blue tabletop and yellow legs, while the chair could use matching colors. Students can also add small patterns, stars, flowers, numbers, or letters. Decoration should be applied carefully so that it does not interfere with the stability of the furniture. ## Adding a Miniature School Environment The table and chair become even more interesting when they are placed inside a miniature classroom. A cardboard box or shoebox can be transformed into the classroom. Students can add a small board, bookshelf, teacher's desk, windows, posters, and other furniture. The wooden-stick table can be placed in the center of the classroom. The chair can be positioned behind it. A tiny notebook and pencil can be placed on the table. A miniature student made from paper can sit in the chair. This creates a complete school scene. ## Making Tiny School Supplies Small school supplies can be created from paper and cardboard. A tiny notebook can be made by folding several small pieces of paper together. A miniature pencil can be represented by a narrow strip of colored paper. A tiny ruler can be made from a thin cardboard strip with small measurement marks. Students can also create a tiny schoolbook with a colorful cover. These accessories help make the furniture appear more realistic. ## Educational Benefits This project offers many educational benefits. One of the most important is the development of fine motor skills. Children must pick up small wooden sticks, position them carefully, apply glue, and hold pieces together while they dry. These activities require concentration and coordination. The project also encourages spatial reasoning. Students must understand how horizontal and vertical pieces can be combined to create a stable structure. Mathematics is also involved. Children can measure sticks, compare lengths, count pieces, and think about proportions. ## Learning Basic Engineering The wooden-stick furniture project is a simple introduction to engineering. Students are essentially designing and building a small structure. They learn that a table needs a stable base and that the legs must support the tabletop. They also discover that braces can make a structure stronger. If the chair falls over, students can investigate why. Perhaps the legs are uneven, the seat is too heavy, or the connections are weak. Instead of giving up, they can redesign the furniture and try again. This teaches persistence and problem-solving. ## Encouraging Creativity Although the basic design of a school table and chair is familiar, students can make their models unique. Some children may create modern furniture, while others may prefer traditional wooden designs. Some may add colorful patterns or miniature decorations. Students can also design furniture for an imaginary school. Perhaps the school has special desks shaped like stars or chairs with colorful backs. There is no single correct design. The creative possibilities are part of the fun. ## Using Recycled Materials Recycling can also be part of the project. Cardboard from old boxes can be used to create supports or classroom walls. Paper scraps can become miniature books and decorations. Clean packaging materials can become shelves, cabinets, or other classroom objects. Using recycled materials teaches students that useful crafts can be made from things that might otherwise become waste. ## Working in Groups The project can be completed individually, but group work can make it even more interesting. One student can build the table, another can build the chair, and others can create the classroom environment. Afterward, everyone can combine their work into one miniature classroom. Group projects encourage communication and cooperation. Students learn to divide responsibilities and respect the ideas of others. Teachers can also encourage students to discuss which designs are the most stable and why. ## Testing the Furniture Testing is an important step. Once the table and chair are finished, students should place them on a flat surface. They can check whether the table stands evenly and whether the chair remains upright. A small object can be placed on the table to test its strength. A small paper figure can be placed on the chair. If something does not work, students can make adjustments. Additional supports or stronger glue connections may solve the problem. This turns the craft into a simple engineering experiment. ## Displaying the Finished Project The finished table and chair can be displayed on a classroom shelf, science table, or craft exhibition. Students can create a small sign explaining the project. The sign might include the title “Our Miniature Classroom Furniture” and a short description of the materials used. If the furniture is part of a larger shoebox classroom, the entire model can become a presentation project. Students can explain how they built the furniture, what problems they encountered, and how they solved them. ## Conclusion A small school table and chair made from wooden sticks is a creative and educational project that combines art, construction, mathematics, and basic engineering. With simple materials such as wooden craft sticks, glue, cardboard, and paper, students can create miniature furniture that looks attractive and realistic. The project teaches children to plan before building, measure materials, compare sizes, create strong connections, and test their designs. It also develops fine motor skills, patience, creativity, spatial awareness, and problem-solving abilities. The finished furniture can stand alone as a craft project or become part of a complete miniature classroom. Adding tiny books, notebooks, pencils, students, posters, and other school objects can turn a few wooden sticks into an entire learning environment. Most importantly, this project demonstrates that learning can happen through making and experimenting. A small table and chair may seem like simple objects, but constructing them helps children understand how everyday structures are designed and built. With imagination, careful work, and a few inexpensive materials, wooden sticks can become the foundation of a fun and memorable educational experience.

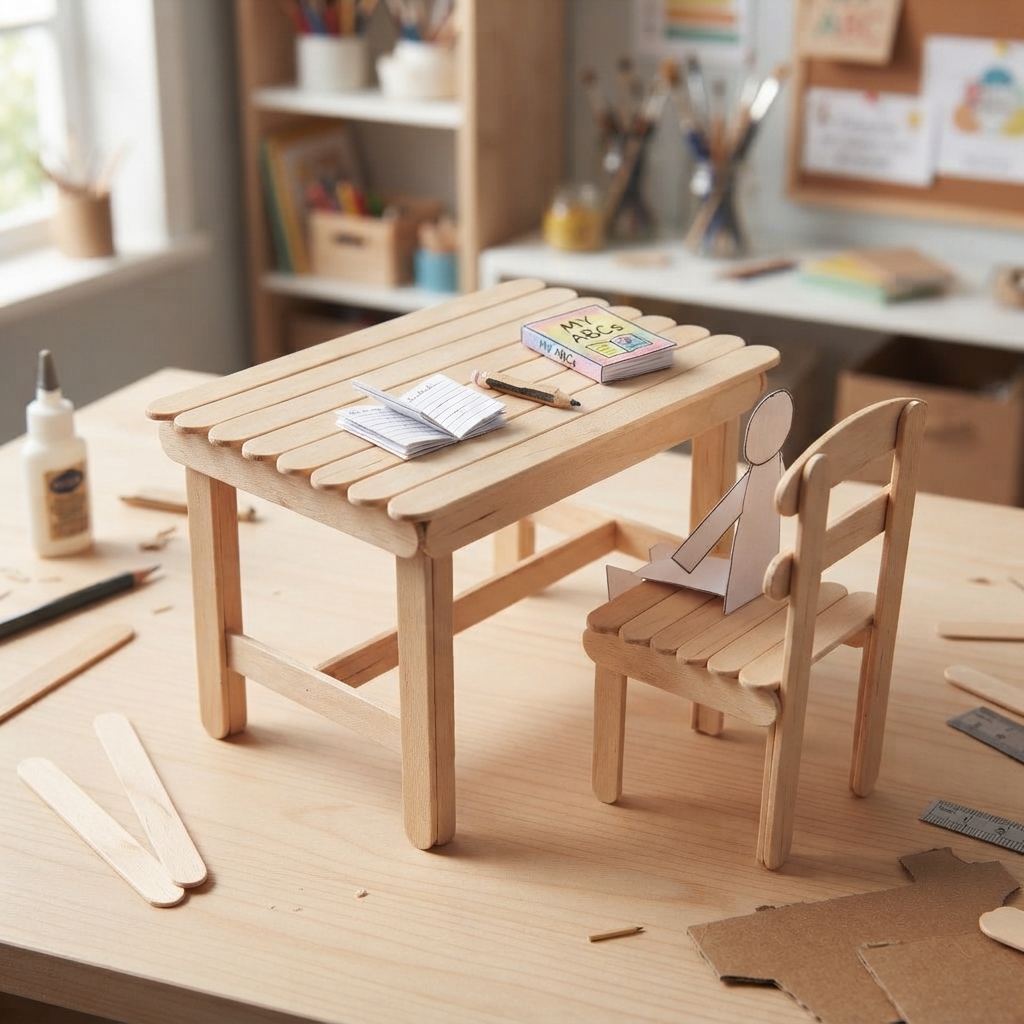
Creating a small school table and chair from wooden sticks is a simple, creative, and educational craft project. With a few wooden craft sticks, glue, cardboard, and colorful materials, children can build a miniature classroom furniture set. This project combines creativity, practical skills, basic engineering, and imagination. It can be used for a school assignment, a classroom decoration, a miniature school model, or simply a fun activity at home.

A miniature table and chair may look simple, but making them requires planning and careful construction. Students need to think about the size and shape of each piece, decide how the wooden sticks will be arranged, and make sure the furniture is stable. Through this process, children learn that even small objects need good design and strong connections between their parts.

The Idea Behind the Project

The purpose of the project is to reproduce two familiar pieces of classroom furniture on a much smaller scale. A school table usually has a flat surface supported by legs, while a school chair has a seat, a backrest, and legs.

Wooden craft sticks are ideal for this type of project because they are lightweight, easy to arrange, and available in many craft stores. They can also be painted or decorated to create different styles.

The finished table and chair can be placed inside a miniature classroom made from a shoebox or cardboard box. Students can add tiny books, pencils, notebooks, and other school supplies to make the scene more realistic.

Materials Needed

The materials required for this project are inexpensive and easy to find. The main materials are wooden craft sticks, strong craft glue, cardboard, scissors, a pencil, and a ruler.

Additional materials can include colored paper, markers, crayons, acrylic or craft paint, paintbrushes, and small pieces of fabric. Recycled cardboard can be used for additional support.

Students may also use beads, buttons, or tiny pieces of paper to decorate the furniture.

Because glue and scissors are involved, younger children should complete the activity with appropriate adult supervision.

Planning the Furniture

Before building, students should make a simple drawing of the table and chair. Planning helps them decide how many sticks they need and where each piece should be placed.

The table should be wider than the chair. The tabletop needs to be large enough to hold miniature books or school supplies. The chair should be slightly lower than the table.

A ruler can be used to measure the length and width of different parts. Students do not need exact measurements, but keeping the pieces proportional will make the finished furniture look more realistic.

Making the Tabletop

The tabletop can be made by placing several wooden sticks side by side. The sticks should be arranged in parallel lines to create a flat rectangular surface.

A couple of additional sticks can be placed underneath in the opposite direction to strengthen the structure. These support sticks should be glued carefully underneath the tabletop.

Students should allow the glue to dry before adding the legs. This is important because the tabletop needs to remain flat and stable.

If the wooden sticks are too narrow for the desired design, several can be joined together. The more sticks used, the wider the tabletop becomes.

Building the Table Legs

The table needs four legs to remain stable. Each leg can be made from one or more wooden sticks.

The legs should be positioned near the corners of the tabletop. They need to be attached at approximately equal distances from the edges.

Students should check that the legs are similar in length. If one leg is much shorter than the others, the table may wobble.

Small cardboard supports can be added between the legs if extra stability is needed. These supports can also make the miniature table look more realistic.

Strengthening the Table

A strong connection between the tabletop and legs is essential. Glue should be applied carefully to the contact areas.

Students can add horizontal wooden sticks between the legs. These pieces act like braces and help prevent the legs from moving sideways.

This introduces a basic engineering concept: structures become stronger when their parts are connected properly.

Students can test the table by placing a small paper book on top. If it remains stable, the design is probably strong enough.

Creating the Chair Seat

The chair seat can be constructed in a similar way. Several wooden sticks can be arranged side by side to create a small square or rectangular seat.

Two support sticks can be glued underneath the seat. These supports help keep the sticks together.

The chair seat should be smaller than the tabletop and positioned at a comfortable miniature height.

Students should make sure the surface is relatively flat so that a small paper figure or toy can sit on it.

Making the Chair Legs

The chair needs four legs. Wooden sticks can be attached underneath the seat, one near each corner.

The legs should be approximately equal in length. Students can use a ruler to compare them before gluing.

For additional stability, small horizontal sticks can connect the legs. These supports can be placed near the bottom or underneath the seat.

Once the glue dries, the chair should stand without falling over.

Adding the Chair Backrest

The backrest is one of the most recognizable features of a school chair. It can be made by attaching several wooden sticks vertically or horizontally behind the seat.

One simple design uses two vertical sticks as supports with two or three horizontal sticks between them.

Another design can use several sticks placed closely together to form a solid backrest.

Students can experiment with different patterns. They might create a traditional rectangular back or a more decorative shape.

Making the Furniture Proportional

Proportion is important when creating miniature furniture. If the chair is too tall compared with the table, the model may look unrealistic.

Students should compare the height of the chair seat with the height of the table. The chair should generally be lower, allowing a miniature student figure to appear as though it could sit at the table.

This part of the project provides an opportunity to discuss scale. A real school table is much larger than the model, but the same basic proportions can be maintained.

Decorating the Table and Chair

Once the construction is complete and the glue has dried, students can decorate their furniture.

The wooden sticks can be painted in traditional colors such as brown, white, gray, or natural wood tones. However, children can also choose bright colors.

A colorful table might have a blue tabletop and yellow legs, while the chair could use matching colors.

Students can also add small patterns, stars, flowers, numbers, or letters.

Decoration should be applied carefully so that it does not interfere with the stability of the furniture.

Adding a Miniature School Environment

The table and chair become even more interesting when they are placed inside a miniature classroom.

A cardboard box or shoebox can be transformed into the classroom. Students can add a small board, bookshelf, teacher’s desk, windows, posters, and other furniture.

The wooden-stick table can be placed in the center of the classroom. The chair can be positioned behind it.

A tiny notebook and pencil can be placed on the table. A miniature student made from paper can sit in the chair.

This creates a complete school scene.

Making Tiny School Supplies

Small school supplies can be created from paper and cardboard. A tiny notebook can be made by folding several small pieces of paper together.

A miniature pencil can be represented by a narrow strip of colored paper. A tiny ruler can be made from a thin cardboard strip with small measurement marks.

Students can also create a tiny schoolbook with a colorful cover. These accessories help make the furniture appear more realistic.

Educational Benefits

This project offers many educational benefits. One of the most important is the development of fine motor skills.

Children must pick up small wooden sticks, position them carefully, apply glue, and hold pieces together while they dry. These activities require concentration and coordination.

The project also encourages spatial reasoning. Students must understand how horizontal and vertical pieces can be combined to create a stable structure.

Mathematics is also involved. Children can measure sticks, compare lengths, count pieces, and think about proportions.

Learning Basic Engineering

The wooden-stick furniture project is a simple introduction to engineering. Students are essentially designing and building a small structure.

They learn that a table needs a stable base and that the legs must support the tabletop. They also discover that braces can make a structure stronger.

If the chair falls over, students can investigate why. Perhaps the legs are uneven, the seat is too heavy, or the connections are weak.

Instead of giving up, they can redesign the furniture and try again. This teaches persistence and problem-solving.

Encouraging Creativity

Although the basic design of a school table and chair is familiar, students can make their models unique.

Some children may create modern furniture, while others may prefer traditional wooden designs. Some may add colorful patterns or miniature decorations.

Students can also design furniture for an imaginary school. Perhaps the school has special desks shaped like stars or chairs with colorful backs.

There is no single correct design. The creative possibilities are part of the fun.

Using Recycled Materials

Recycling can also be part of the project. Cardboard from old boxes can be used to create supports or classroom walls.

Paper scraps can become miniature books and decorations. Clean packaging materials can become shelves, cabinets, or other classroom objects.

Using recycled materials teaches students that useful crafts can be made from things that might otherwise become waste.

Working in Groups

The project can be completed individually, but group work can make it even more interesting.

One student can build the table, another can build the chair, and others can create the classroom environment. Afterward, everyone can combine their work into one miniature classroom.

Group projects encourage communication and cooperation. Students learn to divide responsibilities and respect the ideas of others.

Teachers can also encourage students to discuss which designs are the most stable and why.

Testing the Furniture

Testing is an important step. Once the table and chair are finished, students should place them on a flat surface.

They can check whether the table stands evenly and whether the chair remains upright.

A small object can be placed on the table to test its strength. A small paper figure can be placed on the chair.

If something does not work, students can make adjustments. Additional supports or stronger glue connections may solve the problem.

This turns the craft into a simple engineering experiment.

Displaying the Finished Project

The finished table and chair can be displayed on a classroom shelf, science table, or craft exhibition.

Students can create a small sign explaining the project. The sign might include the title “Our Miniature Classroom Furniture” and a short description of the materials used.

If the furniture is part of a larger shoebox classroom, the entire model can become a presentation project.

Students can explain how they built the furniture, what problems they encountered, and how they solved them.

Conclusion

A small school table and chair made from wooden sticks is a creative and educational project that combines art, construction, mathematics, and basic engineering. With simple materials such as wooden craft sticks, glue, cardboard, and paper, students can create miniature furniture that looks attractive and realistic.

The project teaches children to plan before building, measure materials, compare sizes, create strong connections, and test their designs. It also develops fine motor skills, patience, creativity, spatial awareness, and problem-solving abilities.

The finished furniture can stand alone as a craft project or become part of a complete miniature classroom. Adding tiny books, notebooks, pencils, students, posters, and other school objects can turn a few wooden sticks into an entire learning environment.

Most importantly, this project demonstrates that learning can happen through making and experimenting. A small table and chair may seem like simple objects, but constructing them helps children understand how everyday structures are designed and built. With imagination, careful work, and a few inexpensive materials, wooden sticks can become the foundation of a fun and memorable educational experience.

Leave a Reply

Your email address will not be published. Required fields are marked *