
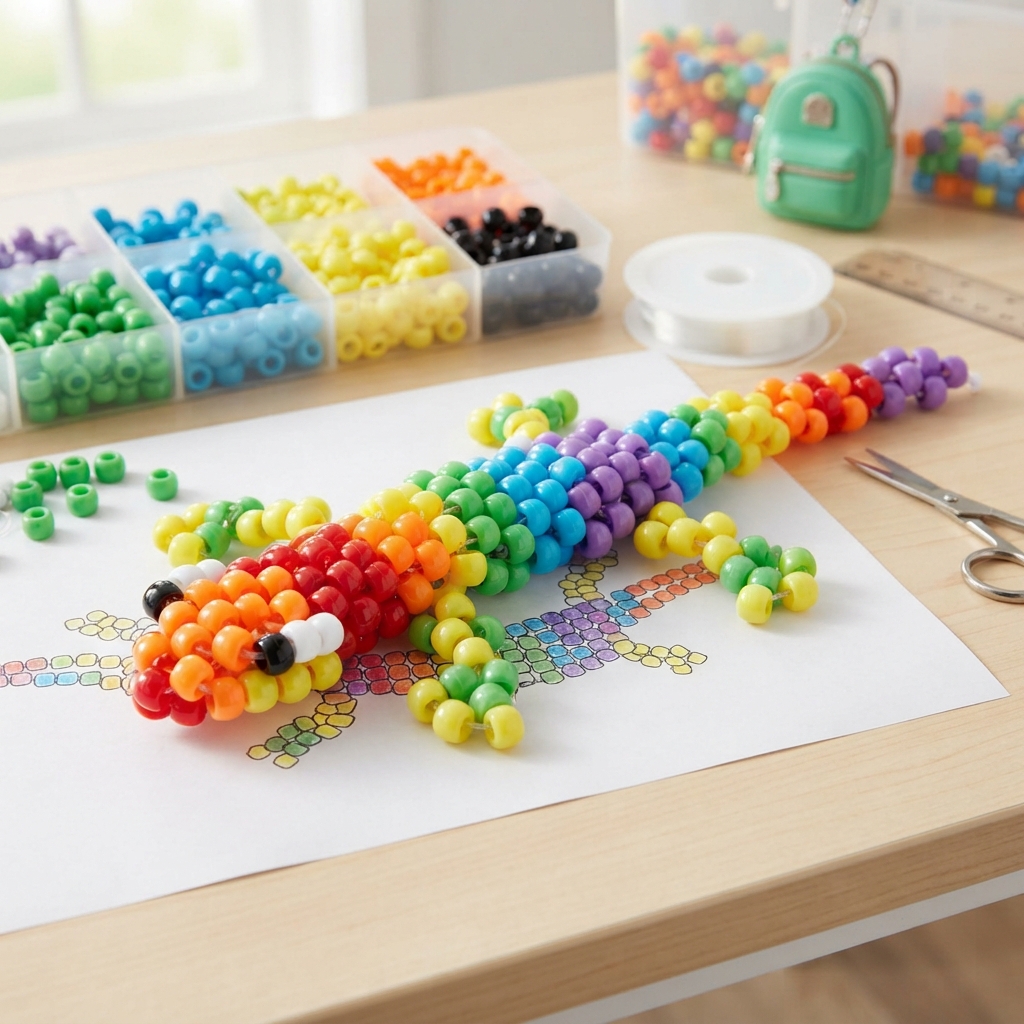
Making a lizard with Pony Beads is a fun and creative craft project for children. With colorful beads, craft cord, and a simple pattern, kids can create a cute little lizard that can be used as a keychain, backpack charm, decoration, or handmade gift.
This project is a great introduction to beadwork because children can practice following patterns while choosing their own favorite colors. They can make a realistic green lizard or create a bright rainbow lizard with completely imaginary colors.
Why Make a Pony Bead Lizard?
Pony bead crafts are entertaining and can help children develop important skills. While making a beaded lizard, children can practice:
- Fine motor skills
- Hand-eye coordination
- Counting
- Color recognition
- Pattern following
- Concentration
- Patience
- Creativity
The project can also be connected to lessons about reptiles, nature, and different animal habitats.
Materials You Will Need

To make a simple Pony Bead lizard, gather:
- Green Pony Beads
- Black beads for the eyes
- Yellow, orange, or other colorful beads for details
- Craft cord or suitable beading string
- Scissors
- A ruler
- A simple lizard bead pattern
Pony Beads are a good choice for beginners because their large holes make them relatively easy to thread.
Safety note: Small beads and craft cords can be choking hazards. Young children should always work with adult supervision, and loose beads should be kept away from very young children.
Choosing the Lizard’s Colors
A lizard does not have to be green.
For a natural-looking lizard, try:
- Green
- Brown
- Dark green
- Yellow
- Black
For a colorful fantasy lizard, children can experiment with:
- Blue and purple
- Pink and yellow
- Orange and green
- Rainbow colors
- Turquoise and blue
Let children choose their own color combinations and create a lizard that is completely unique.
Step 1: Prepare the Cord
Begin by cutting a suitable length of craft cord.
Leave enough extra cord at the ends so you can secure the finished lizard.
Sort the Pony Beads by color before beginning. Place the body beads in one group and the smaller detail beads in another.
Organizing the materials first makes the project easier and more enjoyable.
Step 2: Make the Lizard’s Body
Start with the middle section of the lizard.
Thread the beads according to your chosen pattern.
Create several rows to form the body.
Try to keep each row organized and even.
Avoid pulling the cord too tightly because the finished lizard needs some flexibility.
Step 3: Create the Head
Continue the pattern to make the lizard’s head.
The head can be slightly wider than the body.
Use green beads for a traditional appearance or choose a bright color for a fantasy design.
Add two small dark beads for the eyes.
Step 4: Add the Eyes
The eyes give the lizard its personality.
Use two black beads or other contrasting beads.
Place them symmetrically on the head.
For a cartoon-style lizard, you can use white beads behind the dark beads to create larger-looking eyes.
Step 5: Make the Four Legs
A lizard has four legs, so this is an important part of the design.
Create two front legs and two back legs using several Pony Beads.
Try to make the legs similar in size and position.
The back legs can be slightly longer to give the lizard a more natural appearance.
Step 6: Create the Tail
The tail is one of the most recognizable parts of the lizard.
Continue adding beads behind the body to create a long, narrow tail.
You can use one color for a simple design or several colors for a striped tail.
A gradual change from larger sections to smaller sections can help create a pointed appearance.
Step 7: Add Colorful Details
Now it is time to make your lizard special.
Children can add:
- Stripes
- Spots
- Colorful legs
- A bright tail
- Different-colored eyes
- Rainbow patterns
Every child can create a different lizard.
Step 8: Secure the Lizard
When the lizard is complete, carefully secure the ends of the cord.
Tie a firm knot and trim away any excess cord.
An adult should check the knot to make sure it is secure.
If the lizard will be used as a keychain, make sure the keychain attachment is firmly connected.
Turn the Lizard Into a Keychain
A Pony Bead lizard makes a great backpack charm or keychain.
Attach a suitable keychain ring or clip to the finished lizard.
Children can use it to decorate:
- Backpacks
- Pencil cases
- School bags
- Craft bags
- Room decorations
Always check that the attachment is secure before using it.
Fun Lizard Color Ideas
Classic Green Lizard
Use several shades of green with black eyes.
This creates a simple nature-inspired design.
Rainbow Lizard
Use a different bright color for each section of the body and tail.
This makes a cheerful and colorful decoration.
Blue Fantasy Lizard
Combine blue, turquoise, and purple beads.
This creates a magical-looking reptile.
Pink Lizard
Use pink, purple, white, and yellow for a cute fantasy design.
Jungle Lizard
Combine green, brown, yellow, and orange to create a lizard inspired by a tropical environment.
Make a Family of Lizards
Once children understand the basic pattern, they can make several lizards.
Create a whole family with different colors and sizes.
For example:
- A large green lizard
- A small blue lizard
- A yellow lizard
- A rainbow lizard
- A purple fantasy lizard
Children can give each lizard a name and invent a story about their adventures.
Create a Reptile-Themed Display
The beaded lizard can become part of a larger nature craft.
Use cardboard or colored paper to create a habitat.
Add:
- Rocks
- Leaves
- Grass
- Trees
- Flowers
- Small paper insects
Place the beaded lizard in the scene to create a colorful reptile habitat.
Turn the Craft Into a Learning Activity
Making a Pony Bead lizard is also a good opportunity to learn about reptiles.
Talk with children about:
- Where lizards live
- What lizards eat
- How lizards move
- Why lizards have tails
- How some lizards protect themselves
- The different habitats where reptiles can be found
Children can also count the beads used for the body, legs, and tail.
This turns a simple craft into a combination of art, science, and mathematics.
Tips for Beginners
Choose larger beads that are easy to handle.
Sort the beads by color before beginning.
Keep the bead pattern nearby.
Work on one section at a time.
Count the beads carefully.
Avoid pulling the cord too tightly.
Check the shape regularly.
Ask an adult for help when cutting and tying the cord.
Encourage children to experiment with their own color combinations.
The finished lizard does not need to look perfect. Creativity and enjoyment are the most important parts of the project.
Common Mistakes to Avoid
Losing Track of the Pattern
Check each row before moving on to the next.
Pulling the Cord Too Tightly
Too much tension can make the lizard stiff or distort its shape.
Making Uneven Legs
Compare the four legs while working to keep them balanced.
Making the Tail Too Short
A longer tail helps make the lizard’s shape easier to recognize.
Using a Loose Knot
A weak knot can allow the beads to come loose.
Secure the cord carefully before trimming it.
A Fun Classroom Craft
Pony Bead lizards are excellent for classroom craft activities.
Teachers can connect the project to lessons about:
- Reptiles
- Animals
- Habitats
- Colors
- Counting
- Patterns
- Nature
Children can make different lizards and display them together on a classroom nature board.
A Handmade Gift Idea
A colorful beaded lizard can make a thoughtful handmade gift.
Children can choose colors based on a friend’s favorite colors and create a personalized lizard.
A small handmade card can be added to make the gift even more special.
More Pony Bead Animals to Try
Once children learn how to make a lizard, they can explore other Pony Bead animals.
Ideas include:
- A Pony Bead frog
- A Pony Bead turtle
- A Pony Bead butterfly
- A Pony Bead bee
- A Pony Bead ladybug
- A Pony Bead bird
- A Pony Bead dolphin
Creating several animals can turn into a fun collection of colorful bead creatures.
Conclusion
Making a lizard with Pony Beads is a fun and creative project for children. It helps kids practice fine motor skills, counting, pattern recognition, concentration, and creativity while making a cute animal they can proudly display or use as a keychain.
With a few colorful beads, craft cord, and a simple pattern, children can create green lizards, rainbow lizards, fantasy lizards, or an entire family of colorful reptiles.
Always supervise young children when using small beads and craft cords. With safe materials, simple instructions, and plenty of imagination, a Pony Bead lizard can become a fun and rewarding craft project for home, school, or a children’s activity session.
