
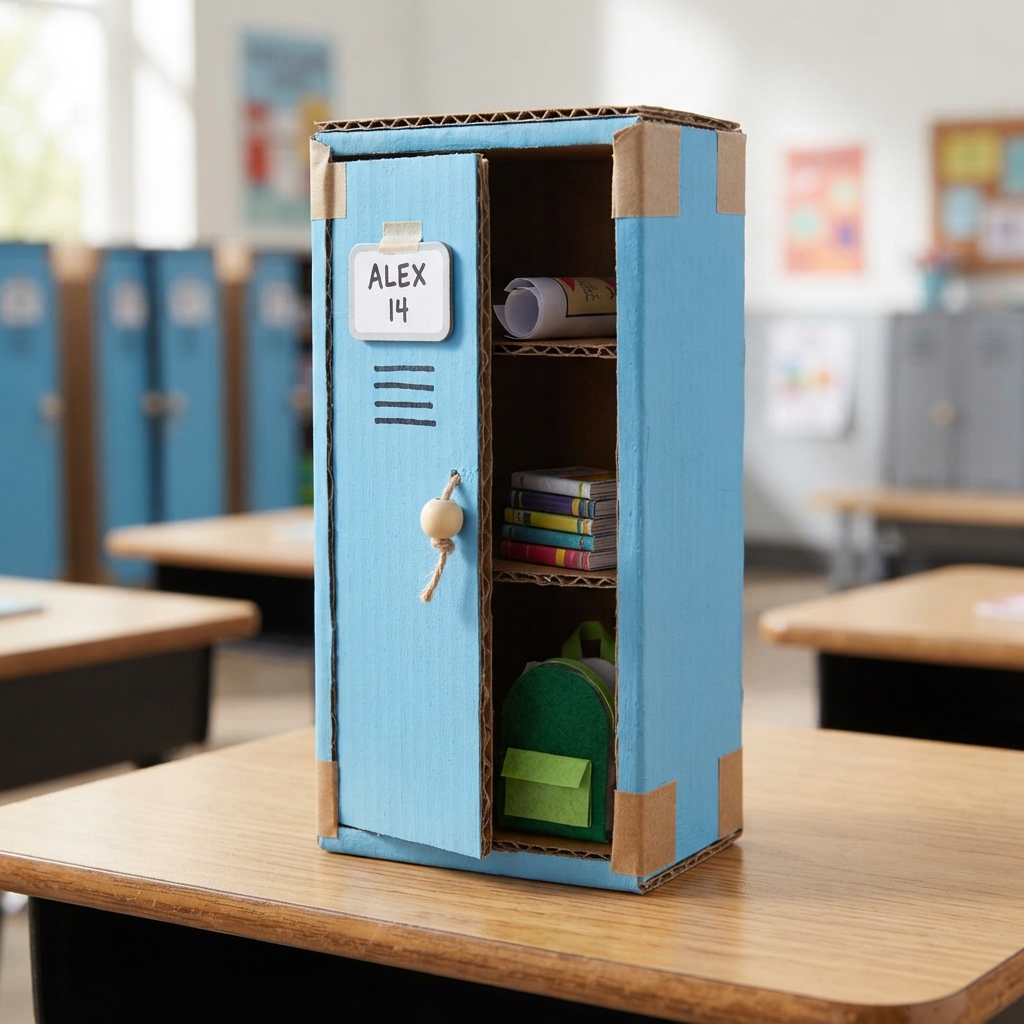
A small cardboard school locker is a creative, affordable, and educational craft project that allows students to transform simple recycled cardboard into a miniature piece of school furniture. School lockers are familiar objects in many educational environments. They provide students with a place to keep books, notebooks, school bags, sports equipment, and personal belongings. Making a miniature locker from cardboard gives children an opportunity to recreate this useful object while developing creativity, practical skills, and an understanding of design.
A cardboard school locker can be used as part of a miniature classroom, a school exhibition, a craft project, or a classroom decoration. It can also become a small storage box for paper notes, tiny school supplies, or other lightweight objects. The project does not require expensive materials. With cardboard, colored paper, glue, scissors, a ruler, and markers, children can create an attractive locker with doors, shelves, handles, and decorations.
The Idea of a Cardboard School Locker
The basic idea is to reproduce the appearance of a real school locker on a much smaller scale. A traditional locker is usually tall and narrow, with a door that opens and closes. Inside, it may contain shelves or hooks for storing belongings.
For a miniature version, cardboard provides an excellent building material because it is lightweight but strong enough for a small structure. Recycled boxes can be cut into panels and assembled into a rectangular locker.
Students can choose whether to make one locker or an entire row of lockers. A group project can include several lockers in different colors, creating a miniature school hallway.
Materials Needed

The materials required for this project are simple and inexpensive. The main material is clean, dry cardboard from an old box or packaging container.
Other materials can include colored paper, white paper, scissors, glue, tape, a pencil, a ruler, and markers. Additional cardboard can be used for shelves and doors.
Small pieces of string, buttons, beads, or paper can be used to create handles and decorations. Aluminum-colored paper can represent metal surfaces.
Paint may also be used if available. However, colored paper is often easier for children and creates a clean finish.
Young children should receive appropriate supervision when using scissors or other craft materials.
Planning the Locker
Before cutting the cardboard, students should create a simple sketch of the locker. Planning helps determine its height, width, depth, number of doors, and internal sections.
A basic locker can have one large door, while a more advanced model can contain two narrow doors.
Students should also decide whether the locker will be open or closed. An open locker allows viewers to see miniature books and school supplies inside.
A ruler can be used to measure the different cardboard pieces. Keeping the measurements consistent makes assembly easier.
Building the Main Structure
The main structure can be made from several rectangular pieces of cardboard. One large piece can serve as the back, while additional pieces form the sides, top, and bottom.
The pieces should be cut carefully and joined with glue or tape.
Students can reinforce the corners with narrow cardboard strips. This makes the structure stronger and helps it maintain a rectangular shape.
The locker should be placed on a flat surface while the glue dries.
If the cardboard bends, another layer can be added to the back or sides.
Creating the Locker Door
The door is one of the most important parts of the miniature locker. It can be made from a rectangular piece of cardboard slightly smaller than the front opening.
The door can be attached with tape so that it functions like a simple hinge. This allows students to open and close the locker.
A small cardboard or paper handle can be attached to the front.
Students can also draw ventilation lines on the door to imitate the narrow openings commonly found on real lockers.
Making the Shelves
Shelves can be added inside the locker. Small rectangular pieces of cardboard can be placed horizontally across the interior.
The shelves should be securely attached to the sides.
Students can decide how many shelves they want. One or two shelves may be enough for a small model.
The shelves can hold miniature books, notebooks, paper folders, or other school accessories.
This makes the project more interactive and realistic.
Creating a Locker Handle
A tiny handle can be made from a narrow strip of cardboard. The strip can be folded into a small loop and attached to the door.
Another option is to use a small button or bead as the handle.
The handle should be securely attached so that children can open the door without damaging the cardboard.
A small paper lock can also be added. This can be drawn with a marker or made from a tiny piece of cardboard.
Adding a Locker Number
Numbering the locker is a simple detail that makes the model look more realistic.
Students can cut small paper rectangles and write numbers such as 101, 102, or 103.
The number can be attached to the upper part of the door.
If several lockers are made, each one can have a different number.
Students can also create name tags and place them below the numbers.
Decorating the Locker
Decoration allows students to express their creativity.
The locker can be covered with colored paper. Traditional school lockers may be gray or metal-colored, but children can use any color they like.
Bright blue, green, yellow, red, or purple lockers can create a cheerful miniature hallway.
Students can add stars, hearts, flowers, geometric patterns, stickers, or school symbols.
The locker could also have a theme related to a favorite subject. A science-themed locker might include small planets, while an art-themed locker could feature colorful shapes.
Making a Row of Lockers
One small locker can become part of a larger project.
Students can build several identical lockers and arrange them side by side.
A row of cardboard lockers can create a miniature school hallway.
Different students can be responsible for individual lockers. Each student can decorate their locker differently while keeping the basic structure the same.
This is an excellent group activity because everyone contributes to one larger display.
Adding Miniature School Supplies
An open cardboard locker can contain miniature school supplies.
Small pieces of folded paper can become notebooks. Tiny rectangles can represent books. Narrow strips of paper can become pencils and rulers.
A small paper backpack can also be placed inside.
Students can create a tiny sports bag or lunch box from folded paper.
These details make the locker look as though a student actually uses it.
Creating a Miniature Backpack
A miniature backpack can be made from a small piece of colored paper or cardboard.
The backpack can have a front pocket, straps, and a small decoration.
It can be placed inside the cardboard locker or beside it.
This connects the locker project with other school-themed crafts and can help students create a complete miniature school environment.
Creating a School Hallway
The cardboard locker can be displayed inside a miniature school hallway.
A large piece of cardboard can become the floor. Another piece can serve as a wall.
Students can add classroom doors, posters, signs, windows, and a school notice board.
The lockers can be placed along one side.
A small paper student can stand near the lockers carrying a backpack.
This creates a realistic school scene using mostly recycled materials.
Educational Benefits
Building a cardboard school locker provides many educational benefits.
First, it develops fine motor skills. Children practice cutting, folding, gluing, and assembling small cardboard pieces.
Second, it develops spatial awareness. Students must understand how flat pieces become a three-dimensional structure.
Third, it encourages creativity because children make decisions about colors, decorations, and accessories.
The activity also introduces basic engineering concepts. Students discover that strong structures depend on good connections and balanced parts.
Learning About Measurement
Measurement is an important part of the project.
Students can measure the height, width, and depth of their cardboard pieces. They can compare the dimensions of the door with the main structure.
Older students can calculate the approximate scale of the model compared with a real locker.
For example, they can discuss how a miniature locker might represent an object several times larger.
This makes mathematics more practical and connected to everyday life.
Learning About Geometry
The cardboard locker can also be used to teach geometry.
The main body is usually rectangular. The door is rectangular, while the handle may contain curved or circular shapes.
Students can identify faces, edges, corners, and right angles.
They can also discuss three-dimensional shapes and how several flat surfaces combine to form a box-like structure.
This makes geometry more interesting because students can observe the concepts in a physical object.
Recycling and Environmental Awareness
Using old cardboard is an excellent way to introduce recycling.
Students can collect clean cardboard boxes from home and reuse them for school projects.
Teachers can explain that reusing materials helps reduce waste.
The project demonstrates that discarded packaging can have a second purpose.
This lesson can encourage children to think creatively about other objects they could reuse instead of throwing away.
Working in Groups
The cardboard locker project can be completed individually or as a team.
In a group, students can divide the responsibilities. One group can build the locker structures, another can create doors and handles, and another can make miniature school supplies.
Students can then assemble everything into one school hallway.
Teamwork encourages communication, cooperation, and responsibility.
It also teaches children how different parts can work together to create a larger project.
Problem-Solving and Engineering
The construction process may involve challenges.
A door might not close correctly. A shelf may fall down. The locker might lean to one side.
Instead of treating these problems as failures, students can investigate the causes.
They might strengthen a corner, adjust the hinge, or add a support.
This teaches the basic engineering cycle of designing, building, testing, and improving.
Children learn that successful construction often requires patience and several attempts.
Creating a Locking System
An advanced version of the project can include a simple pretend locking system.
A small paper tab can be inserted into a slot to keep the door closed.
Another option is to create a paper lock that rotates.
The purpose is not to create a real security device but to demonstrate how a simple mechanism can hold a door in place.
This can be a fun introduction to mechanical design.
Using the Locker for Classroom Activities
The miniature locker can also become an interactive classroom tool.
Teachers can place small question cards inside the locker. Students can open the door and choose a card.
The cards could contain vocabulary words, mathematics questions, science facts, or short challenges.
This turns the craft into a learning game.
Students can also place positive messages inside the locker for classmates to discover.
Creating Personalized Lockers
Personalization can make the project more meaningful.
Each student can create a name label for their miniature locker.
They can decorate the door with their favorite colors or symbols.
A small drawing or paper photograph-style image can be added to represent the student who owns it.
This gives children a sense of ownership and allows them to express their personalities through design.
Displaying the Finished Project
A completed cardboard school locker can be displayed on a classroom shelf, table, or exhibition board.
If several lockers have been created, they can be arranged in a row.
A sign reading “Our Mini School Hallway” can be placed above them.
The project can also be presented to parents or other classes.
Students can explain how they built the locker and what recycled materials they used.
Tips for a Successful Project
Careful measurement is one of the most important steps.
Students should check that opposite sides are approximately the same size before gluing them together.
The cardboard should be thick enough to support the structure.
Glue should be applied in small amounts, and each section should be allowed to dry.
The door should be tested before decorations are added.
Finally, the finished locker should be handled gently because cardboard can bend if excessive pressure is applied.
Conclusion
A small cardboard school locker is an enjoyable and educational craft project that combines creativity, recycling, mathematics, engineering, and school-themed design. With a few pieces of cardboard and simple craft supplies, children can build a miniature locker with a door, shelves, handle, number, and colorful decorations.
The project teaches important practical skills. Students learn to measure, cut, fold, glue, assemble, test, and improve their designs. They also develop spatial awareness, fine motor coordination, patience, creativity, and problem-solving abilities.
The miniature locker can stand alone or become part of a complete school environment. With additional cardboard furniture, paper students, miniature backpacks, books, and classroom decorations, children can create an entire school hallway.
Most importantly, the project demonstrates the value of reusing everyday materials. A simple cardboard box that might otherwise be discarded can become a useful and attractive educational model.
A small cardboard school locker may be miniature in size, but it offers a large opportunity for learning. Through this simple craft, children can explore design, construction, organization, recycling, and imagination while creating something they can proudly display in their classroom.
